Scanning negative films
Cine2Digits allows to scan negative films with a direct colour conversion to preview and capture a positive image.
Keep in mind that Cine2Digits is not made to be a sophisticated colour grading software and that these functions are offering only basic possibilities and are by no means a replacement for a real colour grading process in post.
No precise recipe can be given for scanning negative films in general, as a lot will depend on the film stock, the emulsion, the aging of the film, and the expected result. It must be taken as a trial and error process.
If a more precise colour processing is needed, it is advised to scan negative film as positive and then process the scan in a colour grading software following the desired guidelines for your specific case (LUT corresponding to a given film stock, etc.). For this, you should do a flat scan, save in 12-bit (TIFF), without gamma correction, and with the auto exposure functionality disabled.
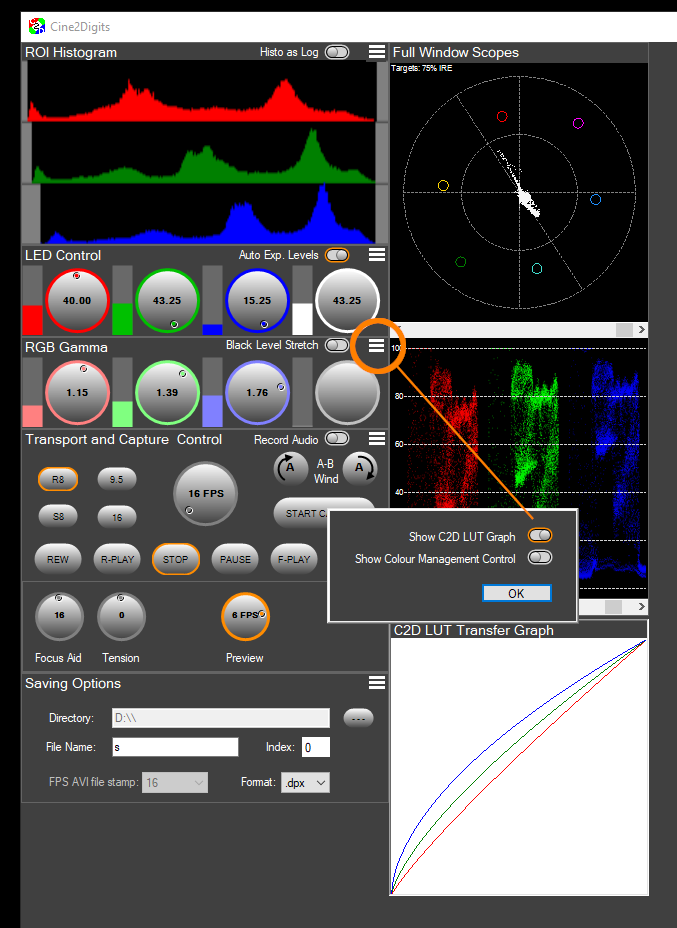
Cine2Digits offers different negative modes that can be activated by toggling the “Negative” switch in the “Transport and Capture Control” menu. To view and understand what the functions do, it is recommended to activate the “C2D LUT Transfer Graph”.
Reversal
This mode is only there to show what the image looks like without colour inversion.
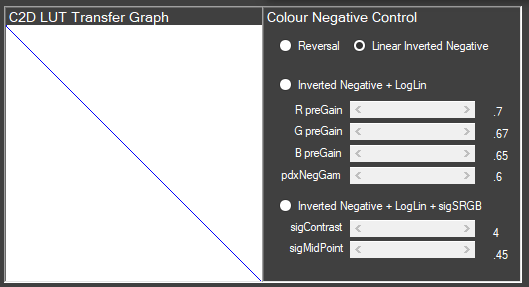
Linear Inverted Negative
This simple mode applies a linear inverse function, which just inverts the colours, with no Gamma or colour correction.
Reversal B&W negative films have a linear response from black to white levels, so this mode will be appropriate.
Inverted Negative + LogLin
This mode applies an inversion following a logarithmic curve, which matches the logarithmic response to light of colour negative films. The curve can be adjusted with the “pdxNegGam” slider and each colour channel can be shifted left or right with the “gain” sliders, to adjust the tonality of the picture.
The standard preset gains compensate for the orange mask on colour negative films.
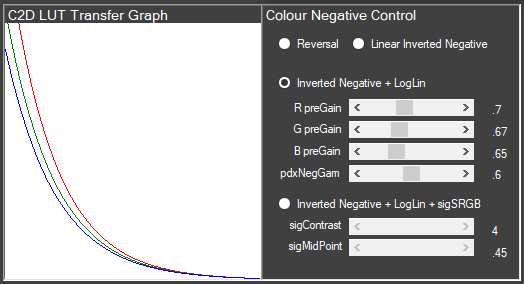
Default values are shown in the screenshot. They will also be reset upon restart of the software.
The LUT resulting from these settings affects Gamma, it does not affect the LED colours. The “Gamma” curve here is of course inverted compared to the Gamma correction curve from the “regular” (positive) controls (“RGB Gamma” buttons in C2D), and the “regular” Gamma correction should not be used (it must always be 1.0 when scanning in negative mode). Likewise, the “Auto Exposure Levels” functionality of the LED should be disabled, it will not work correctly in negative. Manual setting of the correct exposure is required.
Just as the “regular” Gamma correction for scanning positive film (see here), the negative modes work on the maximum bit-depth allowed by the camera (12-bit). If you intend to scan your negative film in AVI, it is advised to invert it in C2D as your output will be 8-bit only and will allow less precision on the negative inversion. But in general, for negative film, you would prefer a flat scan in 12-bit (TIFF format), or at least a 10-bit log scan (DPX format). See here for more details about formats and bit depth.
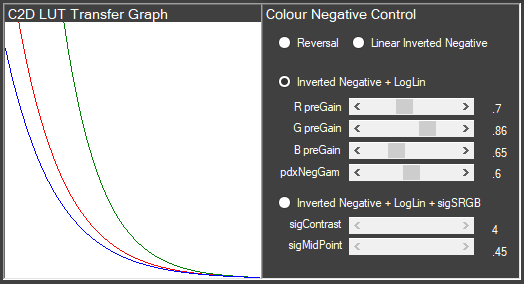
Example of a shift in the greens with a slight gain (“G preGain”).
Inverted Negative + LogLin + sigSRGB
This mode applies the settings from the one above as well as two extra settings allowing a mapping of the output values to the sRGB range, by moving the midpoint and adjusting the contrast.