How to find the optimal scan speed and avoid capturing issues such as dropped frames?
Scanning does not need to be done in real time, it can be faster or slower than the intended framerate of the film. The playback speed can be adjusted afterwards.
However, scan speed must be considered carefully to ensure a good result. Scanning faster may be tempting but may introduce issues such as dropped frames.
The aspects that impact scan speed are the PC hardware and software, the specifications of the camera, the transfer time between camera and PC, the processing in the software, and the saving of files to disk.
We advise testing optimal speed before starting a scan to ensure the best result.
Here are a few very important things to consider:
Workstation hardware and software
Please refer to this link for hardware and software tips: https://support.filmfabriek.nl/tips-to-increase-the-capture-speed
Camera and resolution
The camera has a limited speed, which depends on the defined resolution. So the first thing to set up before testing is the capture resolution.
Transfer to the PC – Received FPS
The image data needs to be transferred from the camera to the PC via the USB 3.0 cable. It then needs to be made available in memory for Cine2Digits. There is nothing to adjust here, this is purely hardware dependent. To test the speed at which images arrive to the PC, you can refer to the “Received FPS” indicator in Cine2Digits. It is very important, before starting your scan, to make sure the pictures can arrive in the software fast enough. If not, you will be missing frames!
Use the preview button for a quick test, you do not need to run a film on the scanner for this.
The speed written on the preview button indicates the speed of the flashes and of the triggers sent to the camera for a capture.
At 18 FPS, for instance, the camera receives 18 triggers per second, and is therefore supposed to take 18 images.
However this speed might be too fast for what the camera can handle at a given resolution.
If it is too fast, the camera will skip some triggers and only take a picture when it can handle it. Usually, if the speed is too fast, the camera will skip every other trigger and the Received FPS will show a framerate at half speed.
An example is shown below:
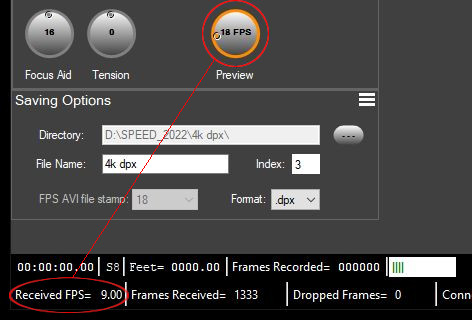
Note that “dropped frames” are not counted here, see below.
Adjust the Preview speed to check what the maximum reachable FPS is. Above a certain speed, you will see that the “Received FPS” does not follow anymore, meaning some images are simply ignored!
Remember the maximum speed you reached and make sure you are never scanning above that speed at this resolution.
As a matter of fact, this maximum speed may be just at the limit of what is possible and may introduce performance issues overtime so we advise to use a maximum speed lower than this framerate (1 or 2 FPS lower to be sure).
Note that when running a film, the mechanical aspects of the scanner and the ageing of the film make it so that there are small irregularities in the transport speed, which can be seen as small variations in the “Received FPS” indicator. This does not matter as long as it stays close to the desired FPS (transport speed).
Processing and recording to disk – Avoiding dropped frames
The maximum FPS you just identified is still theoretical because further processing happen and the images need to be saved to disk, which takes extra time.
So starting from this maximum, you will need to make sure the rest follows and you may need to lower your capture speed.
There are two other indicators to keep an eye one in Cine2Digits: the processing time indicator and the dropped frames counter.

The processing time indicator shows how long it takes to process one image with respect to the available time between two frames at a given speed.
If the green bars are filling up half of the indicator, it means processing one image takes about half of the available time, before the next frame arrives.
If the indicator is dangerously close to being filled up, you are at risk of dropping frames and need to capture slower (it may also be that your CPU is busy with something else, make sure you close every other programs).
When the processing takes too much time, frames will be dropped, meaning they will be skipped and not displayed nor saved. This can happen once if there was a particular load on the CPU at one moment for instance, but it is likely to happen regularly if your scanning speed is too high.
If you are scanning too close to the maximum speed, a delay in processing may be accumulating and cause sudden dropped frames when it reaches a certain threshold.
You will see this in the dropped frames counter, but too late! It may only happen after hundreds or even thousands of frames are captured, so avoid scanning too close to the maximum speed!
Further comments
· If the bottleneck on your system is the CPU, you may see dropped frames happening already during the camera speed test. You should lower the speed until your workstation can cope, and probably consider upgrading your PC.
· Understanding missing frames: Remember that even if there are no reported dropped frames, you may be missing frames in your capture. This is due to the camera ignoring frames, so they are not reported as dropped! See above how to know how to interpret the Received FPS indicator to avoid this, and also make sure this is not due to dirt or bad splices on your film which corrupt the detection of perforations by the laser.
· Consider these tips to increase disk saving speed.