Understanding the Auto-Exposure mode
Cine2Digits offers a way to automatically adjust the exposure for each frame to maximize the dynamic of the captured image in each channel (R, G, B).
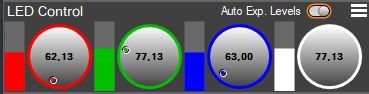
This mode works by analysing the pixel values found in the Region of interest (ROI) and adjusting the LED flashes for the next frame accordingly. The RGB values shown on the rotary controls in the “LED Control” panel will therefore change from frame to frame (the values are the duration of the flashes for each channel, between 10 and 300 µs).
The mode is activated with the “Auto Exp. Levels” switch.
While this maximises the dynamic, and theoretically gives the “best” image possible (the image with the most information for each colour), this mode can also produce undesired effects and should not be fully relied on for a good scan. It helps assist in setting the optimal exposure for a sequence, but if it is left on, it will induce a change of exposure for each frame which then makes it impossible to grade and balance the sequence.
There is also a latency with scene changes, or light changes in the shots, as it can take a few frames to adjust. In some cases, this can produce very noticeable undesired changes from frame to frame.
How to adjust the Auto-Exposure mode?
C2D version 2.x.x: top menu go to ‘Exposure Options’.
C2D version 3.x.x: In the “LED Control” menu, you can adjust the target levels and sensitivity of the system.
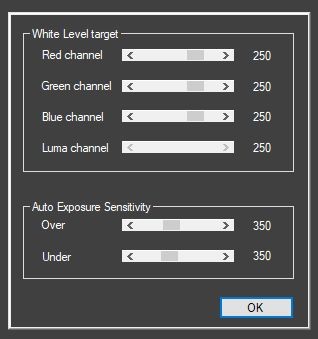
The “White Level targets” set the value above which a pixel will be considered overexposed, triggering a correction by the auto-exposure function. The values are shown here as 8-bit even when scanning at higher bit depth. The maximum is 255 but a margin is advised, and the default value is 250.
Setting a lower value here will be safer in terms of avoiding clipping (overexposure) but will waste a bit of dynamic range, giving generally darker images.
Values are set independently for each channel but should be the same for a balanced white (the Luma channel is enabled only for monochrome cameras).
The “Sensitivity” values for under-exposure and over-exposure affect how quickly the adjustments will be made when detecting under or over exposure, respectively:
– Underexposure: In case of underexposure (the minimum pixel values in the ROI are higher than the minimum possible value), the exposure will be increased for the next LED flash. The amount by which it is increased is proportional to the amount of underexposure. This gives a rapid correction for heavily underexposed frames and this becomes less and less as correct exposure is reached. The sensitivity controls by how much the exposure can be increased from one frame to the next. The default value is 350.
– Overexposure: When some clipping pixels are detected in the ROI (pixels with a value higher than the White Level targets), the exposure will be reduced for the next flash. The amount by which it will be reduced depends on the amount of clipping pixels (the more clipping pixels, the bigger the reduction of the exposure time). The sensitivity value affects how the proportion of clipping pixels is taken into account to calculate the exposure reduction. The default value is 350.
Increasing the values for both sensitivities will result in larger changes from frame to frame. With larger steps the correct exposure will be reached quicker, but with the risk of over-shooting. Setting the value too high will cause the behaviour to become unstable, this will be indicated with the number changing colour to red.
Note that the frame size, or more specifically the ROI size, may affect performance of the auto-exposure function, but it should not be significant.